I had never attempted making bread. I had no interest in bread-making, and I really hate the smell of yeast.
The LAM would make ciabattas and focaccias when we wanted breads that were a bit more fancy, and I was happy to stay away from the kitchen when the yeast came out to play.
Recently, however, I joined a few baking groups, and I guess it finally was time to cultivate a relationship with the dreaded yeast. I mean, I can’t not bake every time a bread recipe is scheduled right? 😛
So I surfed the internet and snooped around researched to see what people are baking. And the word “Tang Zhong” (汤种) – also known as the “Water Roux Method” of bread-making – kept turning up. This method of bread-making was developed by the Asians to make softer and more fluffy breads. What I really, really like about this method of bread making is that the smell of the yeast is kept to a minimum.
So I read and read on how people made this bread, and watched numerous videos on Youtube before I finally took the plunge and made my first loaf of bread.
I was fully prepared for complete failure. I mean, it was the first time I baked bread, and failure was totally acceptable. But I was elated over-the-moon when this emerged from my oven at the end!!

The bread was soft and fluffy – the LAM said it was a bit on the heavy side, probably because I did not leave it to prove for a long-enough time – but overall, it was tasty. I was so so so happy as I was fully expecting a piece of rock to emerge from the oven! 🙂
To make this bread, I started by making the tang zhong. This was easy. I simply mixed the flour, milk and water together in a saucepan and cook this over a medium fire, stirring until a roux was formed. The roux would get streaky as you stir, and that is an indication that the roux was ready. Alternatively, you can check the temperature of the roux using a thermometer – it should read 149F, or 65C.

The roux was set aside (cover with a piece of cling film) and allowed to cool completely. This should take about 2-3 hours.
My little imp added flour, sugar, salt, milk powder and yeast in a mixing bowl and whisked the mixture so everything was combined.


I added milk to 1/2 of the tang zhong, and whisked to mix.
This was poured into the mixing bowl containing the dry ingredients, and mixed with a bread hook.


Once the dough started to form (see picture below), I added the butter, and continued kneading for about 20 minutes, until the dough was smooth and elastic.

The dough would sort of spread, and eventually come together again.

The dough was transferred into an oiled bowl, covered with a piece of damp tea towel and placed in a warm place to prove until the dough had doubled in volume.


Since I was baking a big loaf, I divided the dough into 3 pieces.
First I rolled the dough into an oval shape, about 1/8th inch thick.

The ends were folded to the middle.

I turned the dough 90 degrees, flipped it over and rolled to form a rectangle.

The dough was flipped back. Since I was not using any filling for this bread, I rolled the bread to form a log.


This was placed into an oiled 9×5-inch loaf tin.
The same was done for the remaining two pieces of dough.

A piece of damp tea towel was placed on the loaf tin, and it was left to rise for about 45-50 minutes.

Before baking, I brushed some milk on the dough.

I baked the bread in a 180C oven for about 30 minutes.
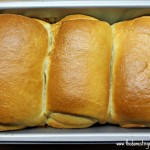
And viola! I had a loaf of freshly baked bread!

Looks like I shall be making more bread from now!
To help you make your delicious food/bakes (and to celebrate my successful bread-making session), I am giving away a Candy/Jelly/Deep fry Thermometer to one lucky reader!
Simply complete the following to participate!
- 1/3 cup all purpose flour - I used bread flour
- 1/2 cup milk
- 1/2 cup water
- 2.5 cups all purpose flour - I used bread flour
- 1 tablespoon sugar
- 1.5 teaspoon salt
- 2 tablespoon milk powder
- 2 tsp instant yeast
- 1/2 cup + 2 tablespoon milk - I had to use 2 tablespoons more
- 1/3 cup (1/2 the amount from above) tang zhong
- 2 talblespoon softened butter
- chocolate chips - I did not add this
- Whisk all purpose flour, milk and water in a vessel until smooth. Place on stove over medium heat and keep stirring until the roux thickens. Turn off the stove when you notice a trail forming when you stir. The thermometer should read 149F (65C) at this point.Allow to cool completely and let it rest for 2 - 3 hours.
- Mix HALF of the prepared tangzhong with milk until smooth. Take flour, sugar, salt, milk powder and yeast in the food processor bowl and pulse to mix. Add the tangzhong-milk mixture and run on slow speed until the dough comes together. Now add the softened butter and process until the dough is smooth and elastic.
- When stretched, the dough will stretch out very thin and finally break in the middle forming a circle. This takes about 15 - 20 minutes if kneading by hand. Transfer dough to an oiled bowl and allow to rise until doubled in volume.
- Next divide the dough into 3 pieces if making one big loaf (9 x 5), into 6 pieces if making 2 small loaves (6 x 4) and into 12 pieces if making mini rolls (muffin pan).
- The process is the same for all sizes. Take each piece and roll into an oval shape about 1/8th inch thick. Take one end of the dough and fold it to the middle of the oval. Fold the other end so it slightly overlaps the top fold. Flip over and roll using a rolling pin so the unfolded edges stretch to form a rectangle. Flip over again. If using filling place it on this rectangle, roll the rectangle and pinch the edges to seal.
- Place the rolls with the sealed side down in the greased loaf pan or muffin pan. Cover and allow to rise for about 45 minutes.
- Brush the tops with egg white, cream or milk and bake in a preheated 180C oven for 30 - 35 minutes until the tops are golden brown.
- Allow to cool in the pan for 5 minutes and then transfer to wire rack to cool completely.


I love Baguette!!~~ tried a few times to make .. still too dense .. still looking for the right way to do it ..
Oooh! I love bread! This looks simple enough to try! I have a question though. Was there really a taste difference between Hokkaido milk vs other regular cheapo charlie milk? Fresh milk vs UHT milk, does it really matter?
Liza I personally think it makes a difference. I used our favourite milk and I loved the taste of the bread!! 🙂
I love a capeseed loaf
I really love to eat Hokkaido Milk Bread!
I love the hot dog bun!
My fav bread has to be brioche! And good job on your attempt on baking bread. I always love to see the results after they are baked.
i love crossiants!!!
Hokkaido Milk Bread!
Now you tempt me to try bread making! :p
Will give it a try this holiday!
OOhhhh looks so yummy! My fav bread would be the baguette. 🙂 Crunchy outside, soft inside!
Wow, you are a great chef! Hats off to you 🙂
Ooh forgot to add that my favourite bread is the difficult to bake is the baguette!
My favourite bread is the croissant!
my fav bread is still baguette
Contemplating if I should bake bread.. hmm.. looks really yummy though. My fav bread is croissant
Your recipe seems easy ..will definitely try.
My fav bread would be croissants
Can I use this recipe and wrap the dough around sausage to make hot dog?
Chocolate Babka!
My fav bread is Spicy Pork Floss bread.
Thanks for hosting the giveaway 🙂
Hi Diana
After baking both Hokkaido and sweet milk bread, which one gives softer bread? 🙂
Hi Cecilia for loaves I prefer Hokkaido milk bread but for buns I prefer the sweet milk bread. Also, if I am out of time, definite sweet milk bread because it does not need tang zhong starter.
Thx!
I tried the sweet milk bread for my sausage buns but I overproofed it (2hrs!) during the second proof (was bz w a cranky bb.. ;s) and the bread texture though soft turned out kinda limp. Does overproofing does that or did I do something wrong?
Hi,
May I know if the balanced half of the tangzhong from recipe ” hokkaido milk bread’ can save for next time use? Keep in fridge? Can keep how long?
Hi yes. you can keep in an air tight container in the fridge for up to 7 days.
Hi ,
Thanks for your recipes ! I have been trying your bread recipes and they are so good . I will try your Italian recipes and others soon. Please keep on posting !
Hi Diana,
I’ve baked using your recipe a few times and always failed at the 2nd proofing. I’m using the 9×5 loaf pan too and it never manage to even rise to half the pan tall. First proof was ok. What could have gone wrong? Thx
Bread still taste awfully good though
Hi Elaine it can be so many factors. Start by changing your yeast. See if it works better. The main culprit is usually the yeast.
Hi Diana,
May you convert the cup to gram.
Thank you.
Pls see http://dish.allrecipes.com/cup-to-gram-conversions/
Hi Diana, you only added half of the tangzhong? How about the other half?