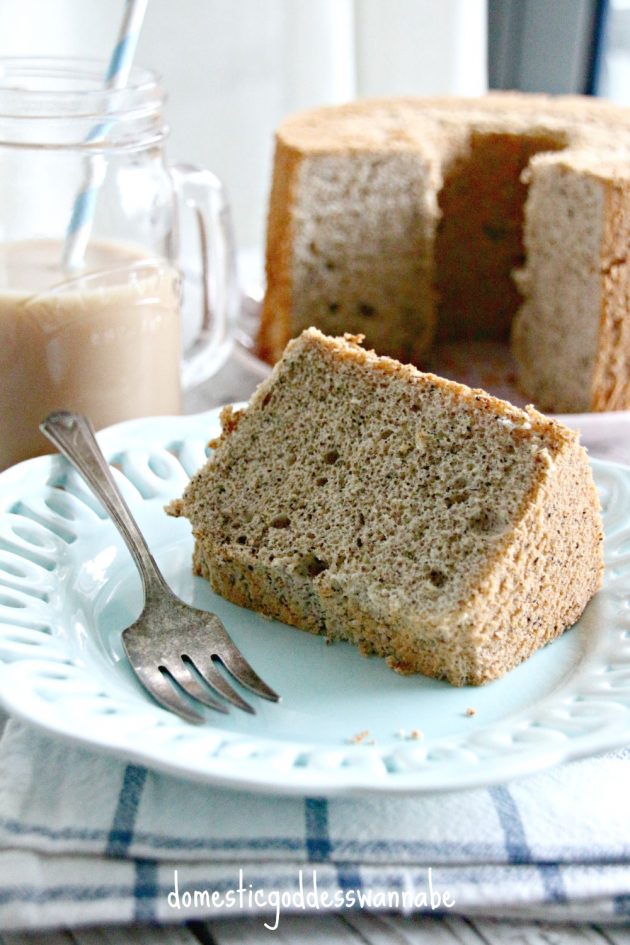
A while ago, I baked a banana bread. Then a day later, craving for a chiffon, I decided to bake an Earl Grey chiffon cake.
I love Earl Grey tea. It has such wonderful aroma. I am not a big tea drinker but ever so once in a while I’d crave for some Earl Grey tea.

When it comes to baking though, I am pretty sure I love anything that contains Earl Grey tea.
The first time I made this chiffon cake, I really fell in love with it.
Chiffon cakes are not the easiest to make. Indeed, I tried quite a few times before I was able to get it (almost) right. My chiffon cakes are much better than they used to be but I still have a lot to learn!
I have listed the steps to make this chiffon below, in case you wanna make one too!
Empty the contents of 6 bags of Earl Grey tea bags into a jug. Add hot water, gave it all a stir, and set this aside. Allow the tea to cool completely before using.
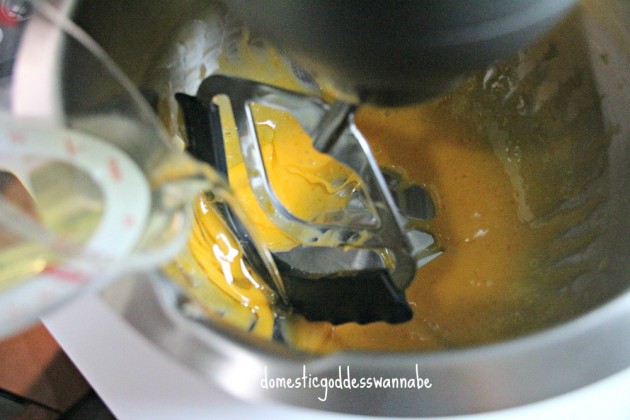
In a mixing bowl, mix the egg yolks, sugar and salt until the mixture is light and creamy.


Into this, add the oil, and continue mixing for about 2 more minutes.
Add the tea leaves and water.
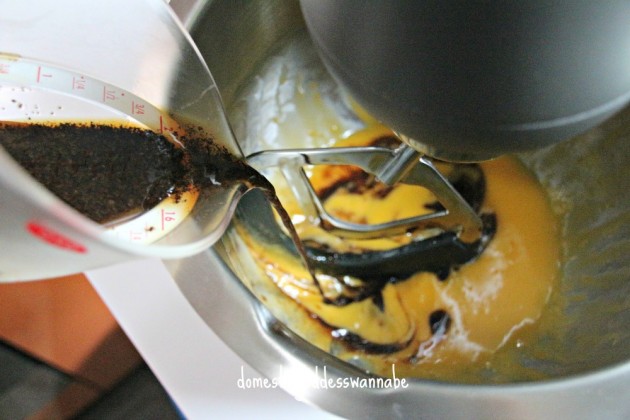 Finally, add the flour/baking powder in 2 additions and mix to combine. Set this aside.

In a clean (make sure it is clean!!) mixing bowl, whisk the egg whites until the mixture turns foamy. Add the cream of tartar.

When the whites have reached the soft peak stage, add the sugar slowly, whisking all the while until the mixture reaches the stiff peak stage.


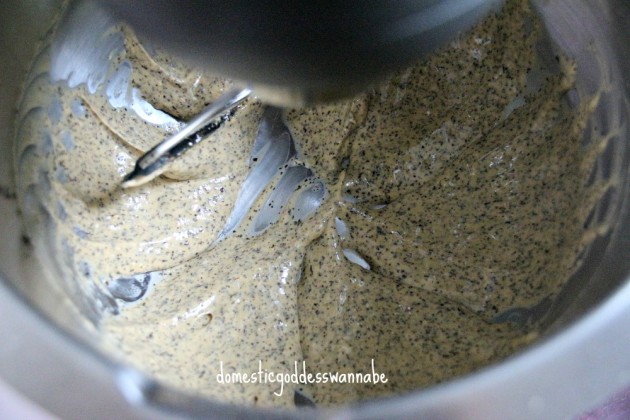
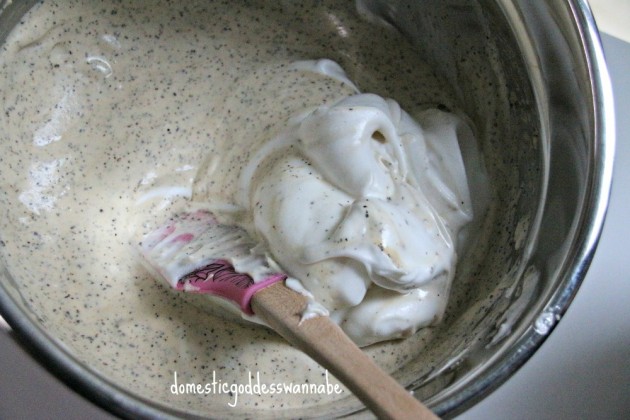
Add a third of the meringue to the yolk mixture and beat it in.


Gently fold the rest of the meringue into the yolk mixture very gently in two additions.

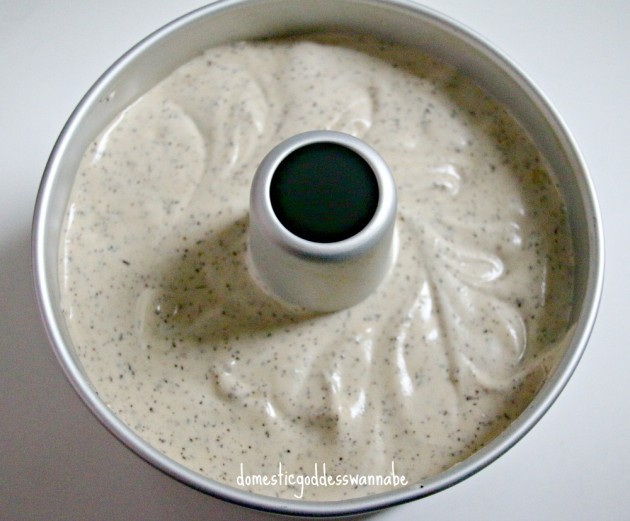
Pour the batter into an UNGREASED chiffon pan.
Lift the pan about 10cm off the table top and drop it to remove the larger air pockets. Repeat this twice more. You can also run a skewer around the batter to remove the air bubbles.

Bake the cake at 170°C for the time stated for your pan size.
In the event that you find that your cake is too brown, you can place a piece of aluminium foil on it and continue baking. Alternatively, you can also reduce the temperature to 150°C if your oven gets too hot.
The other key point to remember, of course, is that you must never grease a chiffon pan. The cake needs to be able to cling to the sides of the pan to climb up. Greased pan = flat cake.
When the cake was baked, turn the pan upside down and allow the cake to cool completely before removing it from the pan.
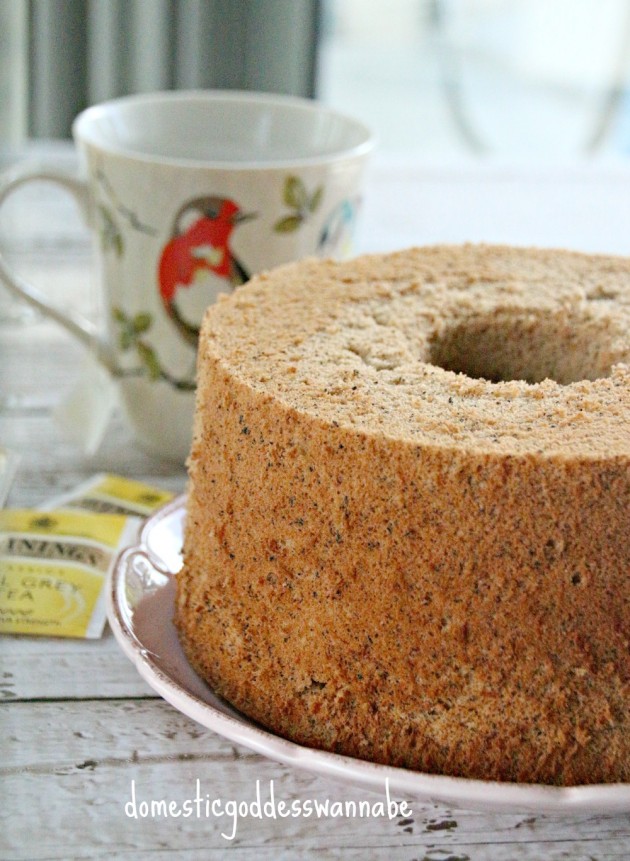
I love chiffon cakes. I guess if there is such a thing, then chiffon cakes are my comfort cakes as they were the only thing I could eat when I was down with sore throats when I was a kid.
So if you are feeling the urge to bake a chiffon, I’d say, “Do it!”. A home made chiffon cake is a thing of beauty.
🙂
*NOTE: Having problems with your chiffon? Chiffon Troubleshooting – See here!
- 4 egg yolks
- 80ml hot water
- 4 Earl Grey tea bags
- 53ml oil - I used canola oil
- 20g caster sugar
- 100g cake flour
- 1/2 teaspoon baking powder
- 1/4 teaspoon salt
- 4 egg whites
- 85g caster sugar
- 1/4 teaspoon cream of tartar
- Baking Time: 35 minutes
- 5 egg yolks
- 100ml hot water
- 5 Earl Grey tea bags
- 67ml oil - I used canola oil
- 25g caster sugar
- 125g cake flour
- 1/2 teaspoon baking powder
- 1/4 teaspoon salt
- 5 egg whites
- 108g caster sugar
- 1/4 teaspoon cream of tartar
- Baking Time: 45 minutes
- 6 egg yolks
- 120ml hot water
- 6 Earl Grey tea bags
- 80ml oil - I used canola oil
- 30g caster sugar
- 150g cake flour
- 3/4 teaspoon baking powder
- 1/2 teaspoon salt
- 6 egg whites
- 130g caster sugar
- 1/2 teaspoon cream of tartar
- Baking Time: 55 minutes
- 7 egg yolks
- 140ml hot water
- 7 Earl Grey tea bags
- 93ml oil - I used canola oil
- 35g caster sugar
- 175g cake flour
- 1/2 teaspoon baking powder
- 1/2 teaspoon salt
- 7 egg whites
- 150g caster sugar
- 1/2 teaspoon cream of tartar
- Baking Time: 65 minutes
- Empty the contents of 6 bags of Earl Grey tea bags into a jug. Add hot water, gave it all a stir, and set this aside. Allow the tea to cool completely before using.
- In a mixing bowl, mix the egg yolks, sugar and salt until the mixture is light and creamy.
- Into this, add the oil, and continue mixing for about 2 more minutes.
- Add the tea leaves and water. Finally, add the flour/baking powder in 2 additions and mix to combine. Set this aside.
- In a clean mixing bowl, whisk the egg whites until the mixture turns foamy. Add the cream of tartar.
- When the whites have reached the soft peak stage, add the sugar slowly, whisking all the while until the mixture reaches the stiff peak stage.
- Add a third of the meringue to the yolk mixture and beat it in.
- Gently fold the rest of the meringue into the yolk mixture very gently in two additions.
- Pour the batter into an UNGREASED chiffon pan.
- Lift the pan about 10cm off the table top and drop it to remove the larger air pockets. Repeat this twice more. You can also run a skewer around the batter to remove the air bubbles.
- Bake the cake at 170°C for the time stated for your pan size..
- In the event that you find that your cake is too brown, you can place a piece of aluminium foil on it and continue baking. Alternatively, you can also reduce the temperature to 150°C if your oven gets too hot.
- When the cake was baked, turn the pan upside down and allow the cake to cool completely before removing it from the pan.
- Note that every oven is different – you need to experiment until you find a temperature that is best for baking chiffon cakes.
- I use 65g eggs for all my bakes.
A CELEBRATORY GIVEAWAY!
To celebrate winning The Best Cooking Blog at in this year’s Singapore Blog Awards, I am giving away a set of Philips Jaime Oliver Stick Blender. Set includes hand blender, chopper and whisk.
“The new Philips Jamie Oliver hand blender features a strong 650W motor with a simple “on / off” button as well as a turbo button, ensuring that busy families can enjoy fresh, healthy food every night of the week. The compact chopper stands sturdy on any kitchen counter and is useful when chopping smaller quantities of onions, herbs or cheese. Homemade pesto and salsas are also really simple to make and add a completely fresh touch to your meals. It also includes a whisk that attaches easily to your hand blender top. It is useful when preparing fluffy whipped cream and homemade mayonnaise. The innovative ProMix technology represents the ultimate in speed and efficacy, to deliver only the finest and evenly cut results. The 1.0L beaker with lid keeps smoothies and batters fresh and is really useful when preparing homemade sauces, pancake batters or smoothies with your hand blender. If you don’t finish the batch in one go, pop on the lid and keep it in the fridge for later. It couldn’t be easier!”
To take part in the giveaway, simply click on the icon below!

This post is linked to the event, Little Thumbs Up organised by Bake for Happy Kids and My Little Favourite DIY, and hosted by Diana from the Domestic Goddess Wannabe.


Hi, Diana. No wonder this cake smell so good…6 bags of earl grey tea! Heeheehee…
LOOKS SOOOO GOOD! one day…. one day….
Diana, I love chiffon cakes! They are so light and airy and I swear I can eat the whole cake (just that I have not attempted as yet hee..hee..). I am embarrassed to say that I have never drunk Earl Grey tea before. Oh dear….but I’ll get to it one day 🙂
Diana, your chiffon is pretty and tall. Earl grey tea flavour is one that I wanna try out too, must go dig out my twg earl grey leaves 1st lol.
Gonna try this some day 🙂
Thanks for sharing!
Diana, i have tried your earl grey recipe and like it very much. was wondering if we can substitute earl grey with other tea?
Hi Michelle of course! You can use any tea you like even the Chinese teas. 🙂
Hi what is the size of your chiffon pan? Do you have a pandan chiffon recipe?
Hi it was a 21cm pan. Yes, recipe will be out soon!
What is the purpose of putting cream of tartar? Coz other recipe don’t hv this.
Hi Bes pls see http://thedomesticgoddesswannabe.com/tell-me-why/
Hi, can this recipe be used for a 25cm tube pan? If not, what will be the proportion? My earl grey tea is in loose form, how many grams will 6 bags be?
Thanks!
Hi Pls see the link for Chiffon pan size guide. The remaining ingredients can be adjusted once you have decided how many eggs are needed for a particular pan size.
Link > http://thedomesticgoddesswannabe.com/tell-me-why/
Many thanks! Final question, is it important to use the correct proportion for the right pan size? Does it matter if I’m using your above for a 25cm pan size? Besides not getting a tall cake, does it impact the result in anyway?
Hi the cake will be shorter but it can still work. Although for chiffon cakes we do want tall cakes because tall cakes = more air = softer texture.
Many thanks! That has been really helpful. Hope it will be a success as I had many failed chiffon attempts…. 🙁
Can you make a green tea chiffon cake?
HI Bennett Yes – I will make one soon so keep an eye out for it 🙂
Tried this today and it turned out great! Thanks!
Could you do one for a pandan chiffon??
Hi Jess pls see here: http://thedomesticgoddesswannabe.com/2015/01/pandan-chiffon-cake/ 🙂
Hi Diana, I am amateur baker. Tried this today, the cake taste really good, but a portion of my cake sank. During baking, the cake rose like a donut at first , then the center portion “burst” open like a volcano crater, when baking time lapsed, it flattened down and looked good. But during cooling outside the oven (placed inverted) , the center shrank or sink and created a layer of Kueh texture in between the cake. Can you enlighten me what could I have done wrong?
Hi Adela it sounds like your oven was too hot. You may have to lower the temperature and see if it works better. Otherwise you may have to get an oven thermometer to check if your oven temperature is accurate!
Thank you for your reply. I have a new thermometer, and yesterday bake is the first time I used it. It showed 165C during the baking process even though my oven dial is pointing at 180C. I do not know which is wrong now…
Hi the thermometer is probably the accurate one.
Hi! I am so glad i chance upon your website. I tried your Earl Grey and Citron Chiffon Cakes and they were amazing. I had a few failed attempts of chiffon previously (when i tried with other recipes last year). After a year, i decided to try making chiffon cakes again and saw your recipe, tried it and fell in love with chiffon again. Thank you so much!
I would like to seek your permission if I could share your recipe on my blog, which i will link back to your page.
Thank you once again!
Love, Karen.
**I’m gonna try more of your recipe really soon!”**
Hi Karen
I am do happy to hear that the recipes worked for you! Yes you may share the recipe on your blog – I took a look at your blog btw, very nice!
Thank you :))))
Hi! Do you think we can bake it in a 18cm/21cm normal round pan? Was thinking of using your recipe to make a birthday cake. As I am a newbie baker would like to ask your advice. Thank you!
Hi you can bake in any pans you like. Just change the quantities of the ingredients.
Tried the 18cm tube recipe today.. it was pretty successful! Thank u !
Hi Diana,
Can we dun use tea leaves in it? Meaning just use the tea without the leave in the baking?
What brand of Earl Grey do you use? Btw, I love your chiffon cake recipe, I have tried your Gula Melaka, Pandan, Baileys and Chocolate ones! My family all loves it!
Thank you for the recipe 🙂
yes of course!
Sure you can leave out the tea leaves. I use Twinnings Ear Grey Tea. 🙂
Thank you Diana! Am going to bake one today 🙂
Hi Diana, I tried making your earl grey chiffon in a 25cm tube pan two times, and both times there was a giant air bubble stuck at the bottom of the batter, which caused a huge crater when I un-pan the cake ): Please advice. I’ve made your earl grey chiffon in a 23cm pan before and that turned out perfect! Thanks!
Hi Diana,
I baked few chiffon cakes but I always find it not perfectly cooked in the middle (around little ring and on top surface). It’s kinda sticky. I even put it for longer (10mins longer).
Is the batter really thick or runny? I find mine quite thick. Is that wrong?
Please give me some feedback.
Thank you
Hi Daisy pls read the Chiffon Troubleshooting section in my FAQ.