I have to confess. I have never made mooncakes before this.
But I have seen so many people make these snowskin mooncakes and they are so pretty!
So this year, I thought I’d give it a shot and try making some. In the worst-case senario, if they turn out to be really ugly, I could always eat them myself. 😛
I am happy to report, however, that I did succeed in making really pretty mooncakes and that in fact, they are really easy to make!

With Pu-er and Oolong filling
I was over the moon! No more paying crazy sums of money for mooncakes and l can make loads to give away to friends and family!
If you are interested in making mooncakes, I will show you how.
To start, I boiled 2 litres of water with a bunch of pandan leaves. I made more because this can be kept in the fridge for a few days which meant that I didn’t have to repeat this step (or wait) when I want to make more mooncakes.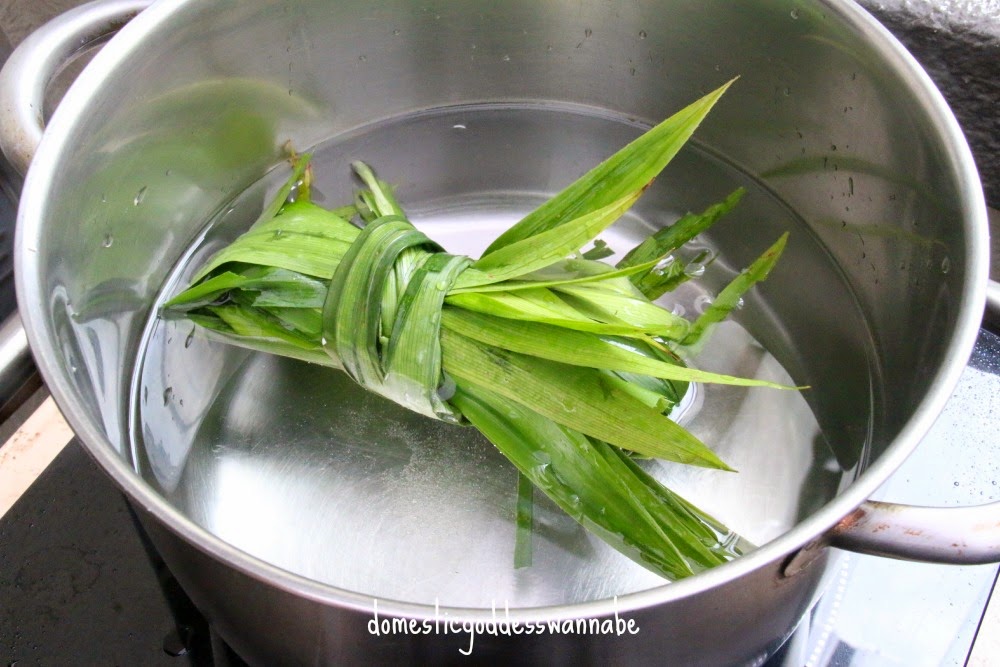 I measured the kao fen (cooked glutinous rice flour) and snowskin flour into a large bowl. Using a whisk, I mixed them.
 I placed the (pandan) water, vegetable shortening and icing sugar into a saucepan and brought it to a boil, whisking all the while until the shortening had melted.
 This was taken off the heat, and poured into the flour. Using a spatula, I stirred until the flour and liquid had come together.
This was left to cool.
In the meantime, I measured the filling and rolled each portion into a ball.

I used ready-made filling – there is nothing I hate more than endless stirring.
Once the dough was cool enough to work with, I kneaded it until it was smooth then I divided it into 3 portions. Into each portion I added food colouring (go easy on the colour!) and kneaded until the colour was uniform.
This is how I like to knead the dough.
I pushed the dough away from me. Then I folded the dough 1/3 of the way towards me, and made another 1/3 fold. Then I turn it 90 degrees and repeated until I got a uniformly coloured dough. I divided the dough into the required portions and shaped each into a ball. I flattened each ball and rolled it into a round disc.
The filling was placed in the middle of the dough and the edges were pinched to seal. I placed this into the mould and pushed then viola! out popped a mooncake!
 To be honest, I really wanted to get some wooden moulds. When it comes to traditional foods like mooncakes, I much prefer the old way of making them.
However, since it was the first time I was making mooncakes, I felt that the plastic plunger moulds would work better because they are much easier to use.
When I went to the shop to buy supplies to make mooncakes, I told the (very nice) aunty at the shop that I wanted to buy only a few essentials. In the event that I was unable to make mooncakes of an acceptable standard, then perhaps I would lose interest and not try again.

With low-sugar lotus filling
She laughed and told me she was sure that I would be back at the shop to buy more supplies.
You know what?
She was right! 🙂

With low-sugar green tea filling
I loved the entire mooncake making process and I love the end products – so yes! I shall be making a lot more mooncakes in the days to come!
NOTE: I bought all my mooncake ingredients from Kwong Cheong Thye.

- 50g kao fen (cooked glutinous rice flour)
- 230g snowskin flour - I used Kwong Cheong Thye Pinpe Premix Powder
- 50g icing sugar, sifted
- 46g vegetable shortening - I used Crisco
- 300g water (boil 500g water with 4 pandan leaves, leave to cool, and measure 300g water)
- Some extra kao fen for dusting
- Combine kao fen and snowskin flour in a big bowl and set aside.
- In a pot, add the icing sugar and shortening to the water and stirring with a hand whisk, bring this to a boil until the shortening had melted.
- Pour this mixture into the bowl containing flour and use a spatula to stir the mixture until a soft dough forms. Set this aside to cool. Form the filling into balls of 25g each. Set this aside.
- Once the dough is cool, knead the dough until it becomes smooth. Add more kao fen if the dough is still too sticky.
- Add food colouring if you are using. You may want to divide the dough into portions if you are using different colours. Place the colour in the middle of the dough and knead until the colour is uniform.
- Divide the dough (21g each). Flatten each portion and roll into a round disc. Place one portion of filling in the middle of each piece of dough. Pinch edges to seal.
- Dust the ball with a little kao fen and press it firmly into the mould.
- Chill the mooncakes before consuming.
- I doubled the portions to make 58 mooncakes.


Hi Domestic Goddess Wannabe
Agree with you that moocakes are easy to make and cheaper. Nowadays, buying mooncakes is like buying gold and silver!
You should also try the bake version. I do not possess any wooden molds, however, this year again, I used Anncoo Journal Piggy moonies featured last year in her blog and gave the cute piggies away. Receivers were so enlightened and they could not stop snapping photos because of the piggy eyes sparking at them.
I saw similar piggy mooncakes at Peony Jade booth at Vivo City which sold at somewhere like S$45 per set of four. I was told by the sales staff that the piggies sold out very fast because of the limited supply each day. The eyes of the piggies are smaller. I think the smaller eyes better which are closer to the real pig eyes (pig got small eyes). Hence, instead of using black beans as featured in Anncoo Journal recipe, use smaller red bean instead.
Blessings
Priscilla Poh
Diana, You did it! Your mooncakes look very pretty and I love the pastel colour 😀 Awesome!!!
Thanks Ann!! I read your recipe many times before I started. Love the results! 🙂
Your friends must be happy to receive these beautiful mooncakes made by you 🙂
Haha Grace, yah they were! I am so happy 🙂
Hi Diana,
These are so lovely. I bet they are yummy too.
If you didn’t mention we wouldn’t know this is your first time making snow skin Mooncake.
mui
Hey Doreen, I did read the recipe many times before I started and I was lucky because it really was a great recipe!
Diana! Now you have got me wanting to make mooncakes! I was never motivated before hmmm…. But the mooncake festival is just around the corner and there is not much time for me. Next year, eh? And eh, I love your nails LOL!
Hi Phong Hong, thank you so much! My nails are my one vanity hehe. So next year I shall be looking out for your mooncakes!
You did it very well for 1st time,i still remember my 1st time very lousy …hahaha
Pretty color too
Thank for support my Best recipes event,Diana^^
Thanks Fion! 🙂
A very successful attempt, Diana. Your snow skin moon cake are so pretty!
Thanks Jozelyn! I am so happy hehe.
Hi Diana, you must have spent alot on the supplies for mooncakes ? I have yet to buy any moulds to make mooncakes. Yours lovely !
Hi Karen actually I didn’t spend a lot. I only bought 3 mould and filling and some flour. And some boxes. Not too bad!
Hi Diana, very lovely mooncakes!
Thank you LY!
Where can I buy the filling and the mould? Can share the price as well?
Hi I got all my mooncake supplies from Kwong Cheong Thye at Aljunied – you can google for the address! Unfortunately, I bought other items as well so I cannot remember how much it was. 🙂
Hi Diana,
Really look nice n yummy.
Kindly advise where can I buy kao fen/cooked glutinous rice flour?
Really interested to try n make some.
Thanks,
Margaret
Hi Margaret! Thank you! I got all my mooncake supplies from Kwong Cheong Thye at Aljunied – you can google for the address! 🙂
I love all the things you do. it looks really awesome!
Thank you! 😀
You are tempting me … How long can this last in the fridge?
MIne lasted 2 weeks!
Hi Diana,
May I know how u store the mooncake in the fridge to keep the freshness and the skin from hardening?
i just keep them covered in the fridge.
Hi .. thanks for the lovely receipe … my I know the water is measure by gram or ml … thanks 🙂
Hi, either will work. 1000ml = 1000g.
Thanks so much for the replied … may I know why my dough tate chewy type one? Or is it or rolled too much ?? Tia 🙂
HI Cindy I really have no idea.. :S
hi, can check how many kg filling you buy? 🙂 thanks!
I bought a lot – you can store them in the fridge for months and I use the filling to make bread buns too.
thanks 🙂
Hi Diana, how do you make the Pu-er & Oolong Filling?
Hi Joanna I bought it ready made.
hihi, Pu-er & Oolong Filling are from the same place you bought the other baking items?
yep!
Hi Diana, Your mooncakes are very beautiful. May I know is the mould also can buy from K C T?
Thanks for sharing.
Hi Diana, if i don’t have snowskin flour what flour do i use?
Hi Besty I don’t think there is a substitute.
Hi diana,
any reason why u choose KCT premix over phoon huat? just wondering is i shd buy from phoon huat or kct as phoon huat locations are more convenient 🙂
Hi Jocelyn I like their premix. It is just personal preference. 🙂
Hi, first I really thank you for your wonderful site, I tried a couple of your recipes and I like it very much.
I tried making above, dough was very soft so I had a hard time to mould it. I tried putting more kou fen, it helped but later I realised the Mooncake mould change. Not sure why. Could it be due to the oil from the paste?
Hope snowskin is harden by tomorrow and can be cut further.
Oh I actually did thaw the paste taken from the fridge before measuring and mixing.
Hi Marg is it because you freeze and thaw it? I make the mooncakes straightaway and never had a problem..
Hi Diana,
Can i know your mould size? Small, Medium?
50g
Hi Diana, you bought their house-brand premix or the green color packaging premix from Taiwan?
The green packaging one!
Hi,
Your mooncakes look really pretty! May I know which color flavoring you got from the store?
I tried strawberry coloring but they turned out really dark red. Thanks in advance.
Hi I use Ameri-color food colouring!
Hi Diana,
I simply love the things you do. It’s always so well done and beautiful.
Thanks Amy – you have been quiet lately. All ok?
Hi Diana,
Do you know whether different brand of snow skin powder and kou fen will have different effect?
I tried using yr recipe but i purchase my supplies from PH. The dough is super sticky. Not possible to roll at all. Would also like to confirm that I should only pour 300gm of water into the flour? Now i realised i may have poured hot boiling water into the flour instead of waiting for the water to cool down. Maybe that’s the cause of my flour turning into muah chee texture?
Hi Diana… May I know how you cooked the glutinous rice flour? I tried googling for an answer but there seemed too many ways to do it.
Hi Winnie, I bought it ready made.
Oh… ok… thanks. At I’ve tried making them with just the glutinous rice flour (without cooking) and it turned out perfectly fine. Ay thanks for sharing your recipes! I enjoyed reading your posts
Oh… ok… thanks. At I’ve tried making them with just the glutinous rice flour (without cooking) and it turned out perfectly fine. Ay thanks for sharing your recipes! I enjoyed reading your posts
hi Diana, can you share what type of colouring you use? Thanks.
The snow skin was soft on 1st day but not subsequent 3rd day. Is there any step I could have probably do wrongly?
Your site got hacked, i clicked on the link to KCT and was directed to a porn site instead! I nearly got a heart attack.
THanks Nat. I have removed the link. Scary!!