It is hard not to fiddle with a recipe sometimes.
Especially when the recipe is such a fabulous one.
What am I talking about? Well Mrs Ng SK’s famous butter cake recipe, of course! If you have tried this cake before, you will be nodding your head vigorously in agreement with me.
Since I love this recipe loads, I made one recently – a Marble Butter Cake. That was just as fabulous. And at the expense of my waistline, I made a Cocoa Butter Cake over the weekend.

Oh. My. God.
It was freaking good!
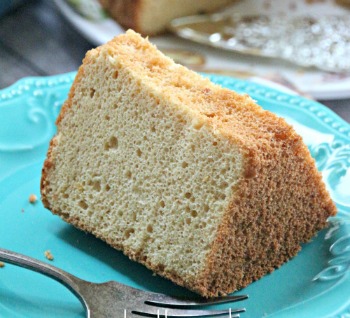
The cake was very buttery. I mean, hey, it is a butter cake after all. It was fragrant. Seriously fragrant. And it was oh-so-delicious.
As you can guess, it didn’t hang around for very long. I did keep one piece in an air tight container for 5 days, just to see if it turns stale, but the cake was still moist. This is one super cake.

And here are the step-by-step instructions on how to make it.
Start by creaming the butter (this is the butter I used) and sugar until the mixture turns light and fluffy. It may take a while, depending on how powerful your mixer is, but be patient, and let the machine do its work.


To this, add the egg yolks, one at a time, and beat this into the batter before adding the next.

Once the egg yolks have been incorporated, add the dry ingredients and milk in the sequence flour-milk-flour-milk-flour.


As soon as the flour has just been incorporated (do not over mix), set this aside.

In a clean mixing bowl, whisk the egg whites until frothy.

Gradually, add the sugar, a little at a time, until the egg whites have reach stiff peak.


Transfer 1/3 of the meringue into the egg yolk batter. Beat it in.


Gently fold the remaining meringue into the egg yolk batter in 2 batches until no white streaks remain.

Pour the batter into a lined and lightly greased 8-inch round baking pan.

Lift the pan about 10cm off your work top and drop it to remove any larger air bubbles. Repeat this two more times.
Bake at 170°C for 45 minutes. As I noticed that the top of the cake was getting quite brown, I reduced the heat to 150°C in the final 20 minutes, then to 140°C in the final 5 minutes. You need to keep an eye on the cake and to know how your oven behaves so you can make the necessary adjustments.
When the cake is done (insert a skewer it the cake and if it emerges cleanly it is done), let the cake rest for 5 minutes in the pan before carefully transferring onto a wire rack to cool completely.

Cut and enjoy every bite of this yummy cake!
UP-COMING WORKSHOPS
Date: Saturday 29 April 2017
Workshop: Hands-on Strawberry Shortcake with Fresh Cream Frosting Workshop
Time: 9.00am – 12.00pm
Venue: The Eureka Cooking Lab
Tickets Link > CLICK HERE

Date: Saturday 29 April 2017
Workshop: Hands-on Savory Tarts and Hand Pies Workshop
Time: 2.00pm – 5.00pm
Venue: The Eureka Cooking Lab
Tickets Link > CLICK HERE
Date: Wednesday 31 May 2017
Workshop: Hands-on Strawberry Shortcake with Fresh Cream Frosting Workshop
Time: 9.00am – 12.00pm
Venue: The Eureka Cooking Lab
Tickets Link > CLICK HERE

Date: Thursday 11 May 2017
Workshop: Hands-on Valrhona Marble Butter Cake and Lana-Inspired Chocolate Fudge Cake Workshop
Time: 9.00am – 12.00pm
Venue: Butter & Bake
Tickets Link > CLICK HERE
Date: Saturday 10 June 2017
Workshop: Hands-on Valrhona Marble Butter Cake and Lana-Inspired Chocolate Fudge Cake Workshop
Time: 9.00am – 12.00pm
Venue: Butter & Bake
Tickets Link > CLICK HERE

Date: Saturday 13 May 2017
Workshop: Hands on Thai Milk Tea Chiffon & Gula Melaka Chiffon Cakes Workshop
Time: 9.00am – 12.00pm
Venue: The Eureka Cooking Lab
Tickets Link > CLICK HERE
Date: Friday 19 May 2017
Workshop: Hands on Thai Milk Tea Chiffon & Gula Melaka Chiffon Cakes Workshop
Time: 9.00am – 12.00pm
Venue: Butter & Bake
Tickets Link > CLICK HERE
Date: Wednesday 24 May 2017
Workshop: Hands-on Red Velvet Cake with White Chocolate Swiss Meringue Buttercream Workshop
Time: 9.00am – 12.00pm
Venue: The Eureka Cooking Lab
Tickets Link > CLICK HERE

Date: Saturday 27 May 2017
Workshop: Hands-on Bread loaves and Buns Workshop
Time: 9.00am – 12.00pm
Venue: The Eureka Cooking Lab
Tickets Link > CLICK HERE

Date: Friday 2 June 2017
Workshop: Hands-on Ondeh Ondeh Cake with Gula Melaka Swiss Meringue Buttercream Workshop
Time: 9.00am – 12.00pm
Venue: The Eureka Cooking Lab
Tickets Link > CLICK HERE
Date: Saturday 24 June 2017
Workshop: Hands-on Ondeh Ondeh Cake with Gula Melaka Swiss Meringue Buttercream Workshop
Time: 9.00am – 12.0pm
Venue: The Eureka Cooking Lab
Tickets Link > CLICK HERE

Date: Saturday 17 June 2017
Workshop: Hands-on Dark Chocolate Drip Cake with Swiss Meringue Buttercream and Meringue Kisses Workshop
Time: 9.00am – 12.00pm
Venue: The Eureka Cooking Lab
Tickets Link > CLICK HERE


- 250 salted butter, at room temperature
- 130g caster sugar
- 4 egg yolks
- 1 teaspoon vanilla extract
- 180g self-raising flour, sifted
- 60 ml milk
- 30g cocoa - I used Valrhona
- 4 egg whites
- 50g sugar
- Start by creaming the butter (this is the butter I used) and sugar until the mixture turns light and fluffy.
- To this, add the egg yolks, one at a time, and beat this into the batter before adding the next.
- Once the egg yolks have been incorporated, add the dry ingredients and milk in the sequence flour-milk-flour-milk-flour.
- As soon as the flour has just been incorporated (do not over mix), set this aside.
- In a clean mixing bowl, whisk the egg whites until frothy.
- Gradually, add the sugar, a little at a time, until the egg whites have reach stiff peak.
- Transfer 1/3 of the meringue into the egg yolk batter. Beat it in.
- Gently fold the remaining meringue into the egg yolk batter in 2 batches until no white streaks remain.
- Pour the batter into a lined and lightly greased 8-inch round baking pan.
- Lift the pan about 10cm off your work top and drop it to remove any larger air bubbles. Repeat this two more times.
- Bake at 170°C for 45 minutes. As I noticed that the top of the cake was getting quite brown, I reduced the heat to 150°C in the final 20 minutes, then to 140°C in the final 5 minutes. You need to keep an eye on the cake and to know how your oven behaves so you can make the necessary adjustments.
- When the cake is done (insert a skewer it the cake and if it emerges cleanly it is done), let the cake rest for 5 minutes in the pan before carefully transferring onto a wire rack to cool completely.
- Note that every oven is different – you need to experiment until you find a temperature that is best for baking butter cakes.
- I use 65g eggs for all my bakes.


Hi Diana,
Of course, I know this one and my head is nodding :p
I like your chocolate version too.
Zoe
Looks very yummy. My boys love chocolate and I cannot wait to try it. Thank you so much for your recipes.
You are most welcome Gladys!
Hi! I tried this recipe and it was so so good! Do you have any tips on how to prevent the cake from rising much more in the middle vs at the sides?
Thx!
G
Hi your recipe are awesome. Have tried the cocoa butter cake, the marble cake and yesterday did chocolate banana cupcake…. my oh my all turn out wonderful. My family and friends were sooooo impressed with the cakes. Am going to try the chiffon next and very sure the taste will be just as good.
That is so awesome! I am so glad you and your family liked the bakes! 🙂
Hi Diana
Why did you reduce the sugar by 50g from the original buttercake?
Thank you.
Ros
Hi Diana
I am sorry that I made the wrong reference. I was referring to your coffee buttercake, not cocoa butter cake.
Ros
Hi Diana! My cocoa butter cake always turn out dry and hard on the sides of the cake. Is it becos of my oven temperature is too high or any other reason?
It can be so many things Catherine. As I was not there when you baked the cake I can’t really advise you as to what might have gone wrong.
could be. many reasons why bakes go wrong – you can google and see if you can find the reason!
Hi Diana for the dry ingredients do I need to mix the flour and cocoa powder together?
yes you do
Hi Diana I baked your cake today. The taste was heavenly but may I know why the top was not as smooth as yours…a few pock marks and when I cut the cake the top layer not so intact. Thanks
Hi I have baked the cakes many times – you have to play around with oven temp/ timing and position to get the best bakes.
Hi Diana I baked your cocoa butter cake for my niece’s birthday cos she loves chocolate cakes. I must say it was so so yummy n moist. I was so glad to see how my niece enjoyed d cake, a big thank you yo you. My family loved d cake too. Awesome recipe, thank you so much
That is so nice to hear Roseline! Thank you for trying the recipe 🙂
What is the size of the baking tin for this chocolate cake? Can I use two 3 1/2″ x 8″ tin? Will the baking temperature differ? My oven trmpreture is a little bit under, do I have to adjust the baking temperature?
Thanks.
Hi pls refer to the FAQ section of the blog for the link to pan conversion!